Summarize Within
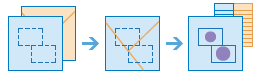
This tool finds features (and portions of features) that are within the boundaries of areas in the first input layer. For example:
- Given a layer of watershed boundaries and a layer of land-use boundaries by land-use type, calculate total acreage of land-use type for each watershed.
- Given a layer of parcels in a county and a layer of city boundaries, summarize the average value of vacant parcels within each city boundary.
If Use current map extent is checked, only those features in the input layer and the layer to be summarized that are visible within the current map extent will be analyzed. If unchecked, all features in both the input layer and the layer to be summarized will be analyzed, even if they are outside the current map extent.
Choose area layer to summarize other features within its boundaries
The area layer that will be used to summarize features that fall within its boundaries.
In addition to choosing a layer from your map, you can select Browse Layers found at the bottom of the drop-down list to browse your contents for a big data file share dataset or feature layer.
Choose layer to summarize
Features in this layer that fall within the boundaries of features in the input layer above will be summarized.
In addition to choosing a layer from your map, you can select Browse Layers found at the bottom of the drop-down list to browse your contents for a big data file share dataset or feature layer.
Choose a distance to generate bins and aggregate into
The distance used to generate bins to aggregate your input points into.
Either the Distance Interval for bins or an Area Layer must be set.
Aggregate using time slices (optional)
If time is enabled on the input point layer and it is of type instant, then you can analyze using time slicing. There are three parameters you can set when you use time:
- Time Interval
- Time Step
- Reference Time
Imagine you had data that represented a year in time, and you wanted to analyze using weekly slices. To do that you would set you Time Interval to 1 week.
Imagine you had data that represented a year in time, and you wanted to analyze using the first week of month. To do that you would set you Time Interval to 1 week, your Time Step to 1 month, and your Reference Time to January 1, at 12:00 am.
Time interval to be aggregate into
Interval of time used for slicing the data. Time interval may be used alone, or used with the Time Step or Reference Time.
If you wanted to create time slices that took place every Monday from 9:00 am until 10:00 am. The Time Interval would be one week. The Time Step would be one week, and the Reference Time would be 9:00:00 AM on a Monday.
Time step to be aggregate into
The step used for calculating a time slice. Time step may be used alone, with a Time Interval, with a Reference Time, or with both a Time Interval and Reference Time.
If you wanted to create time slices that took place every Monday from 9:00 am until 10:00 am. The Time Interval would be one week. The Time Step would be one week, and the Reference Time would be 9:00:00 AM on a Monday.
Reference time used to align the time slicing
The date and time used to align time slicing. Time Steps will start from, and continue backwards for the reference time.
If you wanted to create time slices that took place every Monday from 9:00 am until 10:00 am. The Time Interval would be one week. The Time Step would be one week, and the Reference Time would be 9:00:00 AM on a Monday.
Add statistics fomr the layer to summarize (optional)
You can calculate statistics about attributes of numeric fields of the input layer such as:
- Count
- Mean
- Min
- Max
- Range
- Variance
- Standard deviation
You can calculate statistics about attributes of string fields of the input layer, such as:
- Count
- Any —This statistic is a random sample of a string value in the specified field.
SpatialReference (wkid)
This is a temporary parameter for Pre-Release to set the processing spatial reference. Many big data tools require that a projected coordinate system is used as the spatial reference for processing. By default, the tool will use the input coordinate system, but will fail if it's a geographic coordinate system. To set a projected coordinate system, enter the WKID. For example, Web Mercator would be entered as 3857.
Choose datastore
This is a temporary parameter for the Pre-Release to set the data store that results are saved to. Both data stores are part of ArcGIS Data Store. If you select the spatiotemporal data store, and do not have one installed the tool will fail.
Result layer name
This is the name of the layer that will be created in My Content and added to the map. The default name is based on the tool name and the input layer name. If the layer already exists the tool run will fail.
Using the Save result in drop-down box, you can specify the name of a folder in My Content where the result will be saved.