Plan Routes
Plan Routes determines how to efficiently divide tasks among a mobile workforce.
You provide the tool with a set of stops and the number of vehicles available to visit the stops. The tool assigns the stops to vehicles and returns routes showing how each vehicle can reach their assigned stops in the least amount of time.
With Plan Routes, mobile workforces reach more job sites in less time, which increases productivity and improves customer service.
- Inspect homes, restaurants, or construction sites
- Provide repair, installation, or technical services
- Deliver items and small packages
- Make sales calls
- Transport people from their homes to an event
The output from Plan Routes includes a layer of stops coded by the routes to which they are assigned, a layer of routes showing the shortest paths to visit assigned stops, and, depending on whether any stops could not be reached, a layer of unassigned stops.
If Use current map extent is checked, only the features that are visible within the current map extent will be considered in the analysis. If unchecked, all features in the input layer will be considered, even if they are outside the current map extent.
Choose point layer representing stops to visit
Choose the layer of points that the routes (or vehicles) should visit. These points become assigned or unassigned stops in the output.
In addition to choosing a layer from your map, you can select Choose Living Atlas Analysis Layer or Choose Analysis Layer found at the bottom of the drop-down list. This opens a gallery containing a collection of layers useful for many analyses.
The tool supports up to 2,000 input features.
Travel mode for routes
Choose your travel mode. The output routes will follow roads or walkways and honor applicable rules, such as one-way streets and illegal turns for driving or trucking. The available travel modes are determined by the administrator of your organization.
Routes begin at
Specify where and when the vehicles start their routes.
With Plan Routes you can specify one or many starting locations for your vehicles.
When one point location is specified, all vehicles depart from that point regardless of the number of vehicles available. You can choose a point layer with one point or add a point to the map by choosing Add point to map, clicking the adjacent point editing button, and clicking on the map.
When multiple locations are specified, each vehicle needs to be associated with its own point. The number of vehicles must match the number of points in the layer. Choose a layer with multiple points and specify a field that uniquely identifies the individual routes, vehicles, or drivers in the Route ID field drop-down list.
The starting time is the same for all routes. The time zone for the start time is the same as the time zone in which the starting point or points are located, so make certain the time you enter is local time. For instance, assume you are in Pacific Standard Time (UTC-8:00) and the vehicles you are routing are stationed in Mountain Standard Time (UTC-7:00). If it is currently 9:30 a.m. PST (10:30 a.m. MST) and your vehicles need to begin their routes in 30 minutes, you would set the start time to 11:00 a.m.
If your vehicles start from different time zones, the start time can't be simultaneous; instead, they are offset. For instance, if one route starts from a point in PST and another route starts from MST, and you enter 11:00 a.m. as the start time, the route in PST will start at 11:00 a.m. PST and the route in MST will start at 11:00 a.m. MST—a one-hour difference.
Routes end at
Specify where the vehicles end their routes.
You can configure the routes to end in one of three locations:
- The same location where the routes began, regardless of whether they originated from one or many locations
- A single location
- Many locations—that is, one ending point for each route
Check Return to start if the vehicles start and end their routes at the same locations.
To route all vehicles to a common ending point other than the starting point, uncheck Return to start and either add a point to the map or choose a layer that contains exactly one point.
To have routes end at unique locations, uncheck Return to start and choose a layer containing more than one point. The number of vehicles must equal the number of points in the chosen layer. In the Route ID field drop-down list, choose a field that uniquely identifies the individual routes, vehicles, or drivers. If the vehicles are starting at multiple locations and ending at multiple locations, the route IDs chosen for the starting and ending layers need to match.
Maximum number of vehicles to route
Specify the number of vehicles that are available to visit the stops. The tool supports up to 100 vehicles.
The tool may be able to find a solution that uses fewer vehicles than the number you specify here depending on the total number of stops, how many stops per vehicle you allow, how far apart the stops are, the time spent at each stop, and any limit you set on the total route time per vehicle.
Maximum number of stops per vehicle
This is one of two parameters that balance the overall workload across routes. You can specify a value between 1 and 200.
By lowering the maximum number of stops that can be assigned to each vehicle, the vehicles are more likely to have an equal number of stops assigned to them. This helps balance workloads among drivers. The drawback, however, is that it may result in a solution that is less efficient.
By increasing the stops per vehicle, the tool has more freedom to find more efficient solutions; however, the workload may be unevenly distributed among drivers and vehicles. Note that you can balance workloads by time as well as by number of stops by specifying a value for the Limit the total route time per vehicle parameter.
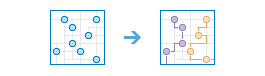
The following examples demonstrate the effects of limiting the maximum stops per vehicle or the total time per vehicle. In all examples there are six stops and two routes, which start at the same location.

|
Balanced travel times and stops per route: The stops are more or less uniformly spread apart, so setting the maximum stops per vehicle to evenly distribute the workload results in routes that are roughly the same duration. |

|
Balanced stops per route but unbalanced travel times: Five of the six stops are clustered near the starting location, but one stop is set apart and requires a much longer drive to be reached. Dividing the stops equally between the two routes causes unbalanced travel times. |

|
Unbalanced stops per route but balanced travel times: The stops are in the same location as the previous graphic, but by increasing the maximum stops per route and limiting the total travel time per vehicle, the travel times are balanced. |
Time spent at each stop
Set the expected average service time spent at each stop. For example, if your are planning a workday schedule for inspectors and the average inspection time is 45 minutes, enter 45.
The service time at all stops is assumed to be the same.
Limit the total route time per vehicle
Specify the maximum amount of time a route should last from start to finish. This includes expected travel time and service times spent at stops along the route. If drivers shouldn't work longer than a given time during a day, such as eight hours, you can specify that limit here.
See the help for Maximum number of stops per vehicle for considerations when balancing workloads.
Result layer name
This is the name of the group layer that will be created in My Content and added to the map. The group layer will contain a layer for each of the following: routes, stops, and directions.
Using the Save result in drop-down list, you can specify the name of a folder in My Content where the result will be saved.