Create Buffers
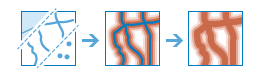
A buffer is an area that covers a given distance from a point, line, or area feature.
Buffers are typically used to create areas that can be further analyzed using a tool such as Overlay Layers. For example, if the question is "What buildings are within one mile of the school?", the answer can be found by creating a one-mile buffer around the school and using the Overlay Layers tool to overlay the buffer with the layer containing building footprints. The end result is a layer of those buildings within one mile of the school.
If Use current map extent is checked, only the features that are visible within the current map extent will be buffered. If unchecked, all features in the input layer will be buffered, even if they are outside the current map extent.
Choose layer containing features to buffer
The point, line, or area features to be buffered.
In addition to choosing a layer from your map, you can select Choose Living Atlas Analysis Layer or Choose Analysis Layer found at the bottom of the drop-down list. This opens a gallery containing a collection of layers useful for many analyses.
Enter buffer size
You can enter a single distance value or multiple values, separating each value with a space. You can also specify an attribute on the input layer that contains the distance value by clicking Field.
Options
Choose how you want overlapping buffers to be handled. For any buffer that is on top of another buffer, the areas in common can be kept (Overlap) or combined (Dissolve).
When using multiple distances, you can choose how to represent the distance from the last buffer distance; for example, if the distances are 10 and 14:
- Choosing Rings results in buffers that go from 0 to 10 and 10 to 14.
- Choosing Disks results in buffers that go from 0 to 10 and 0 to 14.
Options
Choose how you want overlapping buffers to be handled. For any buffer that is on top of another buffer, the areas in common can be kept (Overlap) or combined (Dissolve).
When creating a single buffer around area features (one distance entered), you can choose whether the feature being buffered is included or excluded in the result buffer.
When using multiple distances, you can choose how to represent the distance from the last buffer distance; for example, if the distances are 10 and 14:
- Choosing Rings results in buffers that go from 0 to 10 and 10 to 14.
- Choosing Disks results in buffers that go from 0 to 10 and 0 to 14.
Options
Choose how you want overlapping buffers to be handled. For any buffer that is on top of another buffer, the areas in common can be kept (Overlap) or combined (Dissolve).
When creating a single buffer around lines (one distance entered), you can choose which side of the line to buffer. Typically, you choose both sides. Left and right are determined as if you were walking from the first x,y coordinate of the line (the start coordinate) to the last x,y coordinate of the line (the end coordinate). Choosing left or right usually means you know that the line features were created and stored in a particular direction (for example, upstream or downstream in a river network). At the ends of lines the buffer can be rounded (Round) or be straight across (Flat).
When creating multiple buffers (more than one distance), you can choose how to represent the distance from the last buffer distance; for example, if the distances are 10 and 14:
- Choosing Rings results in buffers that go from 0 to 10 and 10 to 14.
- Choosing Disks results in buffers that go from 0 to 10 and 0 to 14.
Options
Once you choose a layer to buffer, you can choose how you want overlapping buffers to be handled. For any buffer that is on top of another buffer, the areas in common can be kept (Overlap) or combined (Dissolve). In addition, you can specify how multiple distances are to be represented. For layers containing line features, you can choose which side of the line to buffer. For layers containing area features, you can choose whether the feature being buffered is included or excluded in the result buffer.
Result layer name
This is the name of the layer that will be created in My Content and added to the map. The default name is based on the tool name and the input layer name. If the layer already exists, you will be asked to provide another name.
Using the Save result in drop-down box, you can specify the name of a folder in My Content where the result will be saved.